Clearing your cache is a crucial maintenance task for ensuring your devices and browsers perform optimally. Cached data can accumulate over time, leading to sluggish performance and outdated information. This guide provides a detailed, step-by-step explanation for clearing your cache on various platforms and browsers.
What is Cache?
Cache in the context of websites and browsers is a storage location where pages, files, and other elements are temporarily stored in memory for quick retrieval. It can exist in the browser itself, on the web server hosting the website, or even on a distant server within a content delivery network (CDN). The purpose of caching is to serve these stored files to users, eliminating the need for repetitive database queries.
To simplify, web servers and browsers use HTML instructions to construct pages individually, and cache stores the components of these pages in different locations. Without caching, the server would have to rebuild the page from scratch each time it is requested. With caching, the page is stored in memory for repeated use, similar to how the printing press eliminated the need to rewrite entire books by hand for every new copy. In the case of websites, the cache refers to the collection of files and resources stored locally in a browser or within a specific cloud network. This cache helps accelerate the loading of website pages by storing frequently accessed files locally, reducing the need to reload them whenever changes or updates occur.
Why Clearing the cache is important?
Clearing the cache is important for several reasons:
1. To improve website performance: Caching can store static copies of your website’s pages and files, which can speed up the loading time of your website. When you clear your cache, you are removing these static copies, which can force your website to regenerate them from scratch. This can improve the performance of your website, especially if it is slow or has a lot of traffic.
2. To Update Content: Caches store temporary copies of web pages, files, and resources locally on your device. When you clear the cache, it ensures that you are viewing the most recent and updated content on websites. Without clearing the cache, you may see outdated versions of pages and not see the latest changes made by website owners.
3. To protect your privacy: Clearing the cache can help protect your privacy and enhance security. Cached files may contain sensitive information, such as login credentials, personal data, or browsing history. By clearing the cache, you reduce the risk of this information being accessed by unauthorized individuals or malicious entities.
4. To Troubleshoot and Debug: When encountering technical issues on a website, clearing the cache can be a valuable troubleshooting step. It helps to eliminate the possibility of cached files being the cause of the problem. By clearing the cache, you can determine if the issue persists with the most up-to-date website version, allowing for a more accurate problem diagnosis.
5. To Test and Development: For web developers and designers, clearing the cache is crucial during the development and testing phase. It ensures that changes made to the website’s code, stylesheets, or scripts are immediately reflected when testing the website. Clearing the cache helps to avoid confusion and allows developers to see the real-time impact of their changes.
Clearing the WordPress Cache
Clearing the WordPress cache is a simple process that can help to improve your website’s performance and fix any errors that may be caused by outdated cached data. Here are a few common ways to clear the cache in WordPress:
Clearing Browser Cache: Start by clearing your browser’s cache. Each browser has its own method, but typically you can find the option in the browser’s settings or preferences. Clearing the browser cache ensures that you are retrieving the latest version of the website from the server.
Clearing Plugin Cache: If you have a caching plugin installed on your WordPress site, such as WP Super Cache, W3 Total Cache, or WP Rocket, you’ll need to clear the cache within the plugin settings. The process may vary depending on the plugin you’re using, but typically you can find a “Clear Cache” or “Purge Cache” option in the plugin’s settings or dashboard. Click on the appropriate option to clear the cache.
Purging CDN Cache: If you’re using a content delivery network (CDN) like Cloudflare, you may need to purge the CDN cache as well. CDN caching can store copies of your website’s static content on servers distributed globally. Refer to the CDN provider’s documentation or dashboard to find the option to purge or clear the cache for your website.
Server Cache: using their cache plugins or scripts your host might store premade web pages in memory to deliver to your visitors, reducing the load on the server.
Remember, clearing the cache will remove the cached copies of your website’s pages, files, and resources. When you clear the cache, the next visitor will experience slightly longer load times as the cache needs to be rebuilt. However, this ensures that the visitors see the most up-to-date content and any recent changes or updates on your website.
Clearing Browser Cache
Clearing the cache in your web browser is a common troubleshooting step and can help resolve various issues. Here’s a general guide on how to clear the cache in popular web browsers:
Google Chrome:
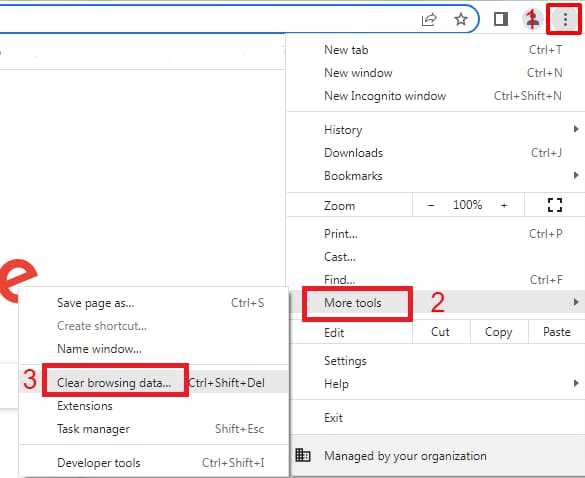
- On your Chrome browser, click on the three-dot menu icon in the top-right corner.
- From the dropdown menu, hover over “More tools” and then click on “Clear browsing data.”
- In the pop-up window, select the time range for which you want to clear the cache. If you want to clear all cached data, choose “All time.”
- Make sure the “Cached images and files” option is selected (you can uncheck other options if you don’t want to clear them).
- Click on the “Clear data” button, and Chrome will clear the cache.
Mozilla Firefox:
- Click the menu button and select Settings.
- Select the Privacy & Security panel.
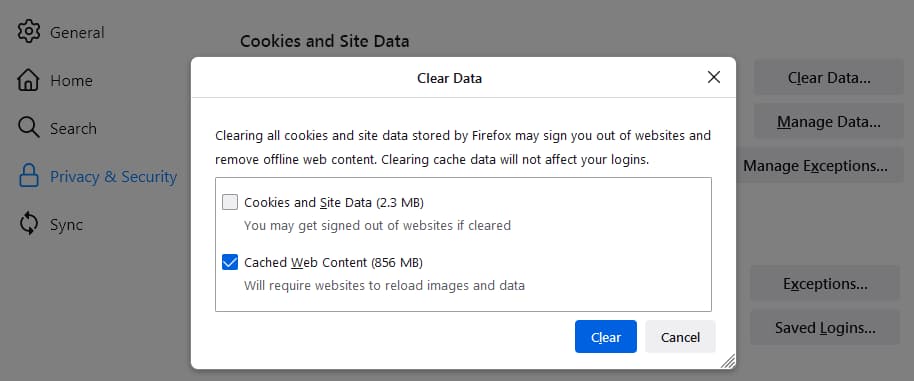
- In the Cookies and Site Data section, click Clear Data…
- Remove the checkmark in front of Cookies and Site Data.
- With the Cached Web Content check marked, click the Clear button.
- Close the Settings page. Any changes you’ve made will automatically be saved.
Tip: Here’s another way to clear the Firefox cache:
- Click the menu button to open the menu panel.
- Click History and select Clear Recent History….
- Next to Time range to clear, choose Everything from the drop-down menu, select Cache in the items list, make sure other items you want to keep are not selected, and then click the OK button.
Microsoft Edge:
- Open Microsoft Edge and click on the three-dot menu icon in the top-right corner.
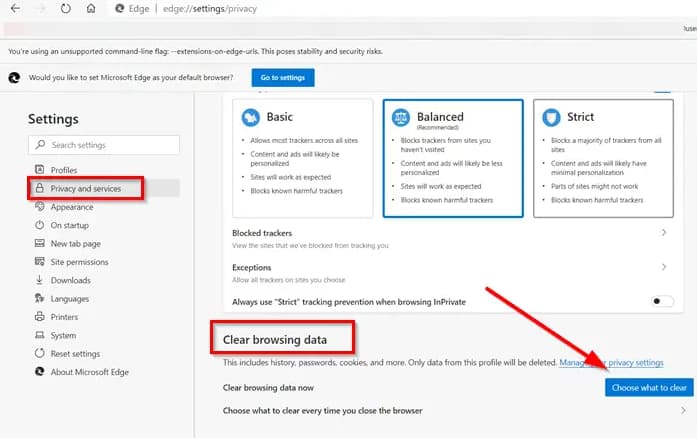
- Go to “Settings” from the menu and select “Privacy, search, and Services” from the sidebar.
- Under the “Clear browsing data” section, click on the “Choose what to clear” button.
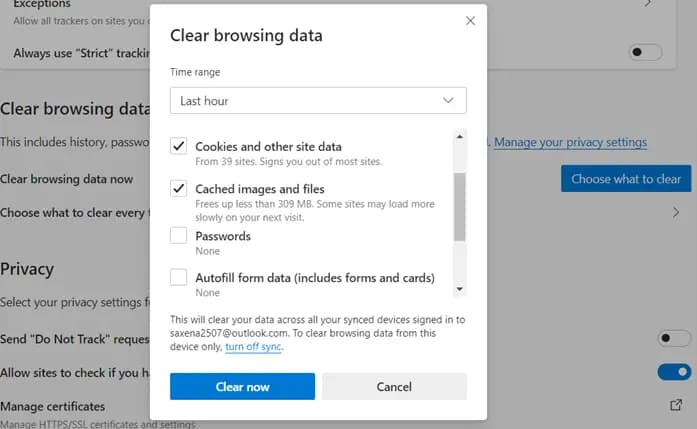
- Ensure the “Cached data and files” option is selected (you can uncheck other options if you don’t want to clear them).
- Click the “Clear” button, and Edge will clear the cache.
Clearing Cache data with plugins
In WordPress, one of the most convenient ways to clear a cache is by utilizing caching plugins. These powerful tools enhance website speed and efficiency by storing static versions of web pages. When changes are made to a site, such as updating content or modifying design elements, clearing the cache becomes crucial to reflect these updates accurately.
Here, We will explore how to clear the cache using plugins in WordPress. A few popular plugins will be discussed here.
WP ROCKET
WP Rocket is a highly regarded caching plugin specifically designed for WordPress websites. With its powerful caching capabilities, WP Rocket improves website performance by storing and delivering static HTML files to visitors, significantly reducing page load times. This plugin simplifies the process of caching by automatically enabling caching rules and optimizing various aspects of your site.
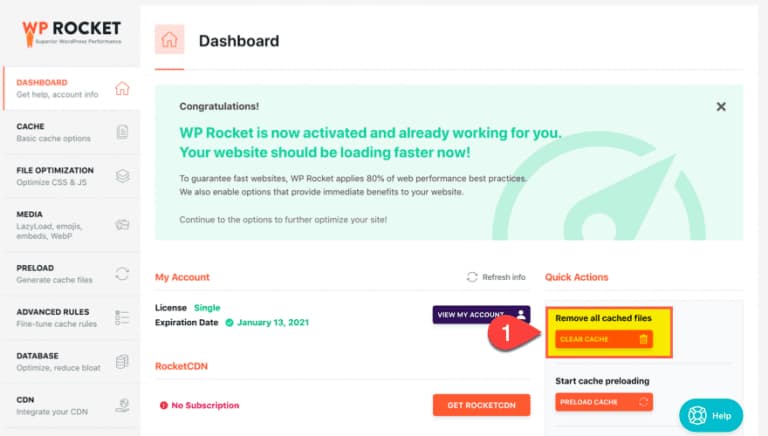
All you have to do is navigate to the WP Rocket settings page, and right there on the main dashboard to the right is a button that says Clear Cache. Click it. Good job! You have cleared the cache.
W3 TOTAL CACHE
W3 Total Cache is a widely used caching plugin for WordPress that offers a range of powerful features to optimize website performance. By utilizing caching techniques, W3 Total Cache improves page load times, reduces server load, and enhances the overall user experience of your WordPress site.
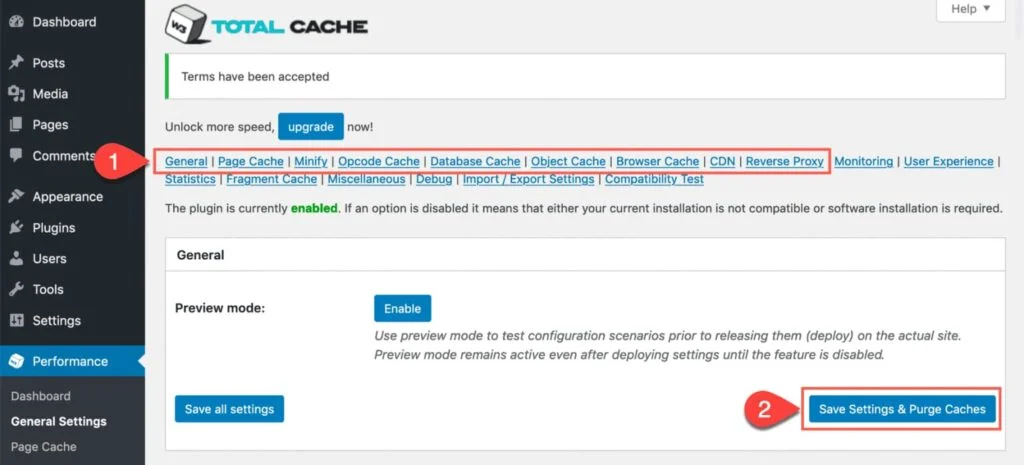
With W3 Total Cache, you have the flexibility to configure various caches such as page cache, object cache, database cache, browser cache, CDN integration, reverse proxy, and opcode cache. Simply navigate to each cache section and customize the settings according to your preferences. Once you’ve set everything up, a straightforward process awaits: click on “Save Settings and Purge Cache.” This convenient action clears the cache, ensuring that your website serves the most up-to-date content and delivers an optimized user experience.
Even if you haven’t made any changes, you can still easily purge the cache with a single click. It’s like experiencing the magic of seamless cache management, effortlessly enhancing your site’s performance.
WP SUPER CACHE
WP Super Cache is a widely used caching plugin for WordPress that offers a straightforward approach to improving website performance by caching static HTML files. Clearing the cache is an essential task to ensure that visitors receive the most up-to-date version of your website. With WP Super Cache, clearing the cache is a simple process that can be done within the plugin’s settings.
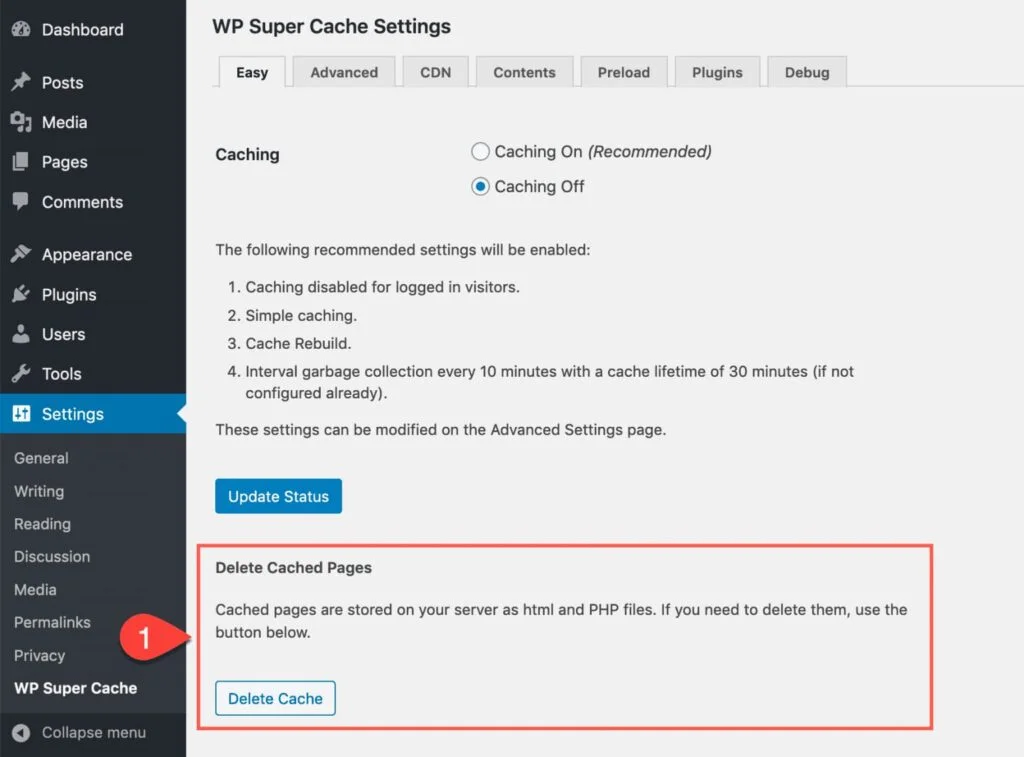
To clear the cache using WP Super Cache, you can navigate to the plugin settings in your WordPress admin dashboard. Once there, you can access the appropriate tab, such as the “Easy” mode, which provides a simplified caching configuration. Within this tab, you’ll find an option to delete the cached pages. By clicking the “Delete Cache” button, the plugin will clear the cached files, allowing for the regeneration of the cache with the latest content.
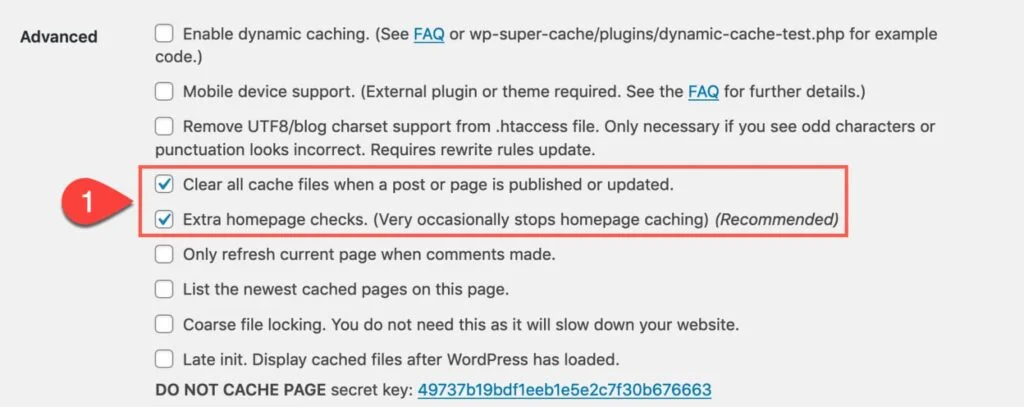
Under the Advanced tab, you will find two other settings you want to enable. The first is Clear all cache files when a post or page is published or updated. The plugin disables this setting by default. Keeping it enabled gets rid of the problem of needing to clear the browser cache when you publish a new post. The second is Extra homepage checks.
WP FASTEST CACHE
WP Fastest Cache is a popular caching plugin for WordPress that offers a straightforward approach to improving website performance through caching. This plugin aims to simplify the caching process and optimize page load times with minimal configuration.
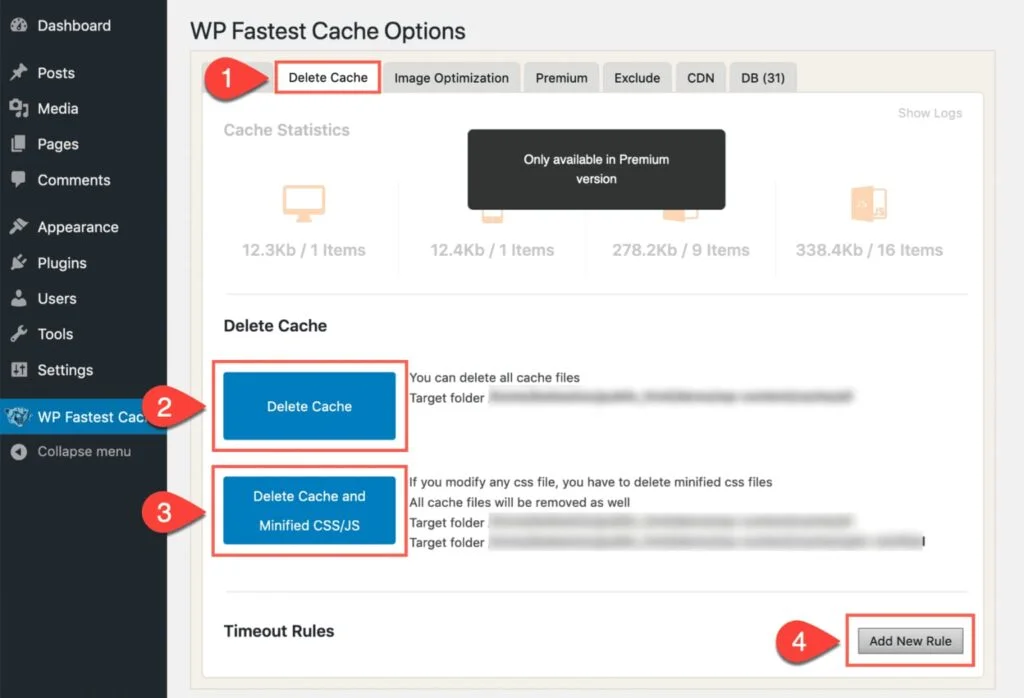
To clear the cache using WP Fastest Cache, follow these simple steps.
Firstly, access the main WP Fastest Cache item in your WordPress dashboard. Within the plugin settings, navigate to the “Delete Cache” tab.
Here, you will find two prominent blue buttons. The first button, labeled “Delete Cache,” performs the task of clearing the cache entirely. The second button, “Delete Cache and Minified CSS/JS,” not only clears the cache but also removes the minified CSS and JavaScript files, which can help troubleshoot certain issues.
Rest assured, these files will be regenerated by the plugin as it continues to function. Additionally, if you require timeout rules, you can conveniently configure them within the same section. By clicking the “Add New Rule” button, you can specify the desired duration for your site to wait before loading a page, regardless of other caching settings. This feature allows you to fine-tune the loading behavior of your website to suit your needs.
Purging CDN Cache
Purging the CDN (Content Delivery Network) cache is an important step to ensure that any changes made to your website are reflected and delivered correctly to visitors. When you update content or make modifications to your site, the CDN cache may still serve the older versions of your files unless you manually clear the cache.
To clear the cache on your content delivery network, log in and look for the clear cache option. For example, Cloudflare is discussed here. Let’s see how to purge the CDN cache
- log in to your account.
- Select the domain name for which you want to clear the cache from the dashboard.
- Go to the Caching menu option, then click on the Configuration tab.
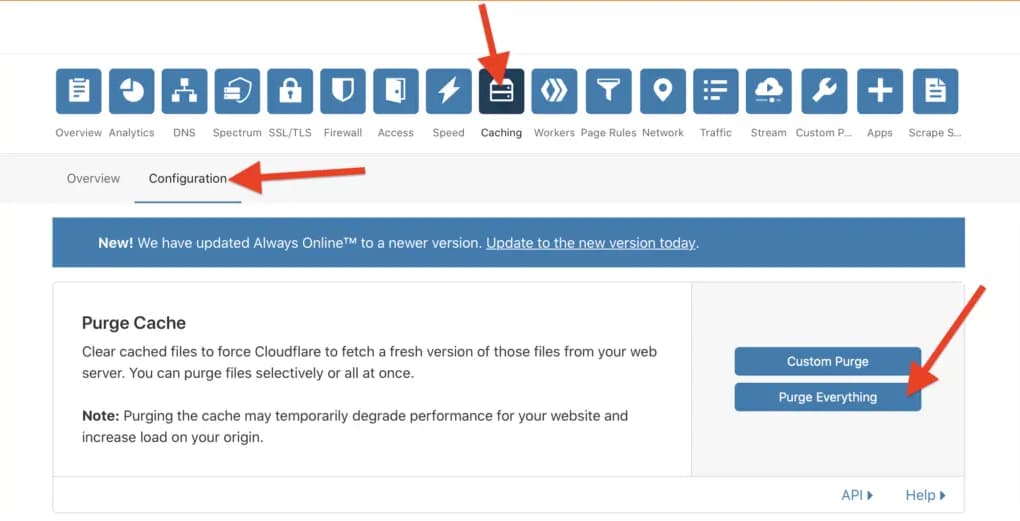
4. Scroll down to the “Purge Cache” section, where you will find two options: “Purge Everything” and “Custom Purge.”
- To clear the entire cache, click on the “Purge Everything” button. This will remove all cached files and resources associated with your website.
- If you want to selectively purge specific URLs or files, click on the “Custom Purge” button. Enter the URLs or file paths you want to clear and then click on the “Purge” button.
Clearing Server Cache
Your hosting provider may be using cache plugins on the server without informing you. This is particularly common with managed hosting services that utilize server-side caching. Server-side caching involves various types of caching, including:
HTML caching: WordPress stores different components of your website in separate locations. When a web browser requests a page, the server builds the page using the stored HTML code. HTML caching stores these pages so that browsers can reuse them without rebuilding them from scratch each time.
PHP caching: PHP pages need to be compiled to generate the final page. Caching PHP pages avoid the need for compilation every time and improve performance.
MySQL caching: The database is frequently queried for the same results when visitors access your website. Caching these results eliminates the need for repetitive queries until a new post is written or updated.
Object caching: WordPress utilizes an object caching API to cache programmatic objects. This cache is typically temporary and lasts for a single request, allowing for efficient reuse of objects.
Servers may also employ additional caching mechanisms such as file-swapping, virtual file systems, firewalls, and sitemaps. The control you have over server-side caching depends on your hosting provider. You might be able to clear the cache through your host’s options settings, which can usually be accessed via your cPanel or admin panel.
It’s important to note that server-side caching is not managed through WordPress itself.
If your hosting provider does not offer a cache-clearing option, you can contact their support for assistance. They may request that you try other cache options first to troubleshoot the issue. Some hosts may provide a testing bypass solution, such as appending “/?nocache=1” to your URL. Keep in mind that each hosting provider has its own approach to server-side caching, so it’s advisable to refer to their documentation for specific instructions.
In general, familiarizing yourself with your host’s server-side caching practices can help you better understand and address any caching-related issues you may encounter.
Clearing The Divi Cache
The Divi cache can often be a common culprit behind various issues encountered while working with the Divi theme. When starting a new site build, it is advisable to turn off the Divi cache as one of the first settings. Although the cache feature may have its benefits once the site is live and no longer under active development, it is highly recommended to disable it completely during the development phase. At the very least, ensure to click the “CLEAR” button to reset the cache.
To access this setting, navigate to your WordPress Dashboard and go to Divi > Theme Options > Builder > Advanced. Within this section, you can locate the Divi cache setting and disable it.
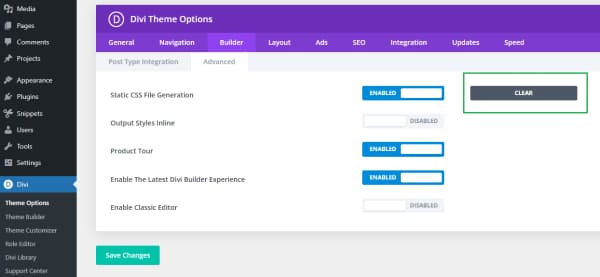
In some cases, you may encounter a situation where the “CLEAR” button fails to clear all the cached CSS files in Divi. If this occurs, you can manually delete the entire “et-cache” folder located in the public_html > wp-content directory of your website files.
Advanced Tip: It is best practice to keep the Divi cache setting disabled while your site is actively being developed and modified. By doing so, you can ensure that any changes or updates you make to the site are immediately visible without being hindered by cached content.
Final Thoughts
Clearing your cache is an important step to ensure that your website displays the most up-to-date content and delivers optimal performance to your visitors. With a step-by-step explanation, you can easily follow the process and effectively clear your cache.
Clearing your cache doesn’t have to be a daunting task. By following a step-by-step approach, you can confidently navigate through the cache-clearing process. Whether you’re using caching plugins like WP Rocket, W3 Total Cache, or WP Fastest Cache, or managing caching settings directly through your CDN provider like Cloudflare, the fundamental steps remain similar.
After clearing the cache, don’t forget to thoroughly test your website to verify that the changes are visible and that everything functions as expected. Check different pages, images, styles, and interactive elements to ensure they load correctly and provide a seamless user experience.
with cache clearing, you can confidently manage your website’s cache and optimize its performance, delivering a faster and more engaging experience to your audience.
To learn more about troubleshooting problems please visit Troubleshoot


0 Comments